Alarm Notification Pipelines
Alarm notification pipelines are logic diagrams that control how alarm notifications are sent out, including who they are sent to and when. They can be used to achieve many advanced alarming scenarios, such as delays, escalation, and parallel delivery. Pipelines provide an easy to use drag and drop mechanism for creating complex notification scenarios.
Creating Pipelines
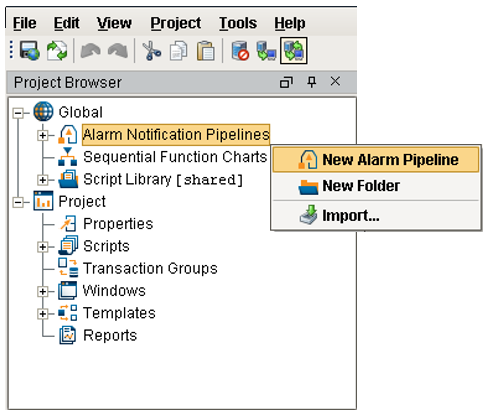
Before you create a pipeline in the Designer, you need to configure at least one alarm notification profile and at least one roster in the Gateway. Then in the Designer, you create the Pipelines under the Global node of the Project Browser. Alarm Pipelines, unlike other types of resources such as windows and Transaction Groups, are global resources, and are not part of a project. A defined pipeline runs in the Gateway, and you can see the same pipelines available to edit regardless of the project that is currently open.
When you create a new pipeline, or select one to edit, the Designer Switches to the Pipeline Workspace. The workspace is basically a blank canvas, on which you arrange and connect together various Pipeline Blocks. Each pipeline block has an input, and potentially has outputs. Using the mouse, you can draw connectors between the output of one block into the input of another. The START block, wh ich you will see when you first create the pipeline, cannot be moved or deleted and is the only fixed part of the workspace. It represents the entry point for alarm events into the pipeline, and is treated like an output block.

Multiple outputs can be connected to a single input. Also, it is perfectly acceptable to write the output of a downstream block back to the input of an earlier block, creating a loop. Of course, some care should be taken when doing this, as it can easily result in unexpected behavior, like sending out many emails for one event!
Pipeline Blocks
The Pipleline Blocks are described individually in the next section, but here is a brief overview:
-
Notification
Delivers a notification through the selected Notification Profile.
-
Delay
Blocks the alarm event for the specified amount of time.
-
Splitter
Forwards a single event concurrently to multiple other blocks.
-
Switch
Evaluates a non-boolean Expression, and forwards to an output based on the result. -
Expression
Evaluates an Expression that results in either true or false, and forwards the event to that output.
-
Set Property
Evaluates an Expression, and sets the result as a runtime property on the alarm event.
-
Jump
Forwards the alarm event to a different pipeline.
Pipeline Properties
Pipelines have only a few property settings, but they are important.
To display and modify the properties
Click on the gray area of the Pipeline workspace anywhere there isn't a block.
In the lower-left corner of the Designer, the Pipeline Properties are displayed. They are as follows:
-
Dropout Conditions
These dictate when alarms fall out of the pipeline. There are three possible conditions: Acknowledged, Cleared, and Shelved. If any of the selected conditions become true for an event in a pipeline, it will "drop out" entirely, no matter where it is at. No further action will be taken for that event. -
Pipeline Enabled
Indicates whether or not the pipeline is allowed to receive events.
Event Flow
Understanding how events flow through pipelines is crucial to leveraging them fully. Alarms are configured on individual tags, and each alarm can specify a target pipeline for active and clear conditions. When the condition for that alarm is met a new alarm event is generated and sent to the entry point of the associated pipeline. The alarm event then moves through the different logical elements of the pipeline until it finally reaches a pipeline endpoint, or until the alarm matches the pipeline's dropout condition, upon which it then exits the pipeline. There can be multiple alarm events in a pipeline at any given point in time and you can view the current status of the pipeline from the Alarm Pipelines status screen in the Ignition Gateway. It is possible to forward events from one pipeline to another, making it possible to create multipurpose and reusable pipelines.
Each alarm event progresses sequentially through the blocks of a pipeline. However, multiple alarm events can exist in parallel in the pipeline, and new events may enter the pipeline at any time. Some block settings may result in alarm events being held up, such as consolidated notification, but one alarm event cannot affect other events in the pipeline. In this particular case, when multiple events will be collected together for notification, the events that don't drop out of the pipeline after notification are individually forwarded to the output of the block.
At every transition, and occasionally inside of the block execution as well, the dropout conditions will be evaluated. If the event no longer meets the conditions, it will drop out of the pipeline. It is crucial to understand how this works in order to understand pipeline execution. For example, a common scenario is to place a Delay block directly in front of a Notification block. If the delay is 5 minutes, and "Clear" is one of the pipeline drop out conditions, it effectively means that only events that stay active for longer than 5 minutes will actually result in notifications. If acknowledge is one of the dropout conditions, it would mean that operators (or anyone viewing alarm status) would have 5 minutes to acknowledge them, and only then would notifications be sent.
Event Instances and Runtime Properties
As mentioned, a new "alarm event" is generated each time an alarm transition to active. This event consists of core data, but also has arbitrary properties available on it. The alarm configuration properties are available, as well as associated data, but in addition there are "runtime properties", that only exist while the alarm event is in memory, and are only used by pipelines. These properties can be accessed by several block types, and runtime properties can be created and updated with the "Set Property" block type.
During an alarm event's lifetime, its properties may be updated at any time. When an alarm goes to clear, for example, the system sets information about that state on the alarm event. In the pipeline, if a block accessed the "state" property, it would see a different value than if it had checked just moments earlier.
It may be possible for a specific alarm event to exist multiple times in a pipeline. This is especially true when using the Splitter block, which takes events and forwards them concurrently to multiple outputs. When this occurs, the alarm event is "branched" and a new "event instance" is created. Each event instance will start with identical properties, but future modifications of properties will only affect the particular instance. All instances of an event will properly reflect properties set later by the system, such as acknowledgement or clear state.
Pipeline Lifecycle
Given the potentially long running nature of pipelines, it's important to understand how they operate when you edit them. Each pipeline normally has only one instance running at a time, which handles all of the events that go into it. When you edit a pipeline and save, however, a new instance is instantiated. The old instance is "retired", but continues to run until all of the existing events are done. The new instance only receives events generated after the time that it was created, it does not take over the previous instance's events.
Commonly Used Properties
The following screenshot shows how you can access the two commonly used sets of properties in the Expression Block: the Main and State properties.
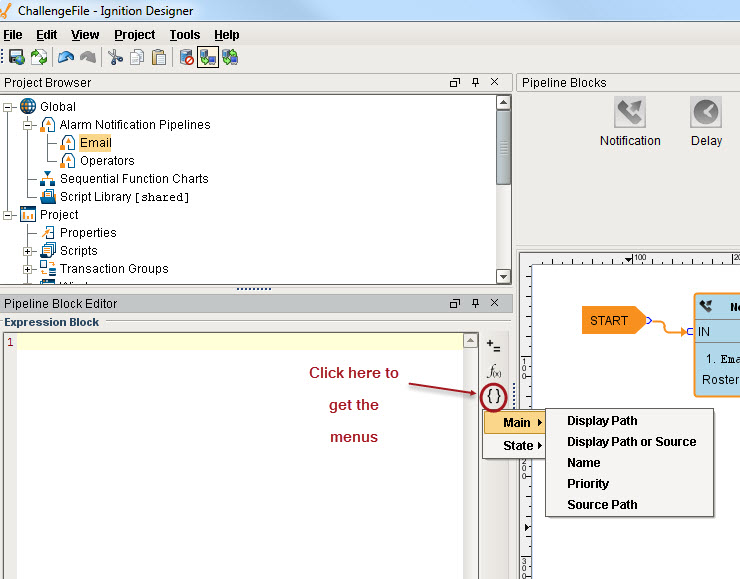
The Main properties are information about the alarm that are independent of whether the alarm is currently active, clear or acknowledged. The are:
-
Display Path
-
Display Path or Source
-
Name
-
Priority
-
Source Path
The State properties are information about the alarm that change while the alarm is changing, and some of them even change each time the alarm goes from active to clear to ack (acknowledged).
-
Ack Time
-
Ack'ed By
-
Ack'ed By (Name)
-
Acked?
-
Active Time
-
Active?
-
Clear Time
-
Clear?
-
Current State
-
Event State
-
Event Time
-
Event Value
-
Is Shelved?
Alarms events are made up of many different properties. Refer to the Alarm Properties section for information on alarm properties and how they are used.
Pipeline Blocks
Pipeline blocks are the building blocks of the Alarm Pipelines. Each block has an input and zero or more outputs. Each block, depending on the type, will perform some action for the pipeline, such as sending a notification, setting a property, or evaluating an Expression.
Notification
As the name suggests, the Notification Block is responsible for actually sending notifications. Each notification block can target one particular notification profile, which represents one method of notification, such as email, sms, or voice. Each type of notification profile will have its own relevant properties for configuration, although some features are common to all profile types. The various profiles will also behave differently, according to their capabilities, in regards to how notifications are ordered. For example, the email profile is capable of sending a message to many recipients at once, while the SMS and voice notification profiles must step through each contact sequentially.
Basic Setup
There are two required settings for notification blocks: the notification profile to use, and the On-Call Roster to use. The profile will dictate the method through which notifications occur, and the roster will dictate who receives the notifications. The call roster provides an ordered list of contacts, which will first be pared down according to each user's schedule. The resulting contacts will be notified in order, based on how the profile operates.
The settings displayed will depend on the type of profile selected.
Email Settings
From Address - Email address used for the "from" field.
Subject - The subject of the email. May refer to properties of the alarm, such as name, value, etc.
Message - The body of the email. Like the subject, may refer to properties of the alarm.
Consolidated Message - The message sent when consolidation is turned on, and more than one alarm is being sent. Can refer to properties, and additionally support a special expansion syntax of "{{ ... }}", where everything inside of the double curly braces will be repeated for each alarm in the consolidation group.
Test Mode - If enabled, logs to the console each time an email would be sent, instead of sending the actual email.
Voice Settings
Require PIN - If true, the user will need to enter their PIN in order to hear the alarm notification messages. The user's PIN is defined in the user management section of the Gateway. If false, the any user will be allowed to hear the messages after answering.
Allow Acknowledgement - If false, users will only be allowed to listen to alarms, not to acknowledge them.
Delay Between Calls - Introduces a delay between calling each contact, for each alarm. The pipeline dropout conditions are checked regularly between calls and while waiting, so this would provide time for the alarm to drop out before calling the next person. The delay is only enforced after following a "successful" call (a call that was answered). Unanswered or errored calls will move on to the next contact right away. Please note that long delays can block other alarms in the call queue.
The delay is applied to all contacts for a particular alarm, so using "fair scheduling" (enabled in the Gateway configuration) can help reduce blockage by interleaving different alarm notifications.
Test Mode - If enabled, messages will be logged to the console indicating when and to whom calls would have been made, without actually making a call.
SMS Settings
Message - The message to use for single events.
Consolidated Message - Like email, the message to use when multiple events are sent together, due to the block's consolidation settings.
Delay Between Notification - As with voice, a delay between each message sent, to give the recipient time to acknowledge and prevent further notification.
Test Mode - If enabled, logs messages that would have been sent to the Gateway console, and does not actually send them.
Consolidation
Notification consolidation allows you to limit the number of notifications sent by specifying a delay during which incoming events will be collected. When the delay expires, all events that have arrived during the period of time will be sent together to the notification profile. The manner in which the profile implements consolidation will vary, but in general the result will be a shorter message, or fewer messages, than would have occurred otherwise.
Consolidation is defined with two parameters:
Delay - How long to wait after the first eligible alarm arrives for other alarms. In other words, if an alarm comes in and would pass the frequency setting, it will be delayed for this amount of time.
Frequency - The max frequency with which the profile can send alarms. This setting works in conjunction with the delay.
The delay is used to protect against situations where an event might generate many alarms together, while the frequency is used to ensure that contacts aren't notified too often, for example if an alarm is rapidly going in and out of the active state.
Delay
The delay block simply blocks events for the specified amount of time before forwarding them to the next block. They are generally used to wait for the dropout condition to become satisfied for an alarm.
For example, a 5 minute delay might be used to give operators viewing control screens a chance to acknowledge, and only send notifications if they haven't (the "active delay" deadband on the alarm could be used to delay the alarm as well, but in that case it wouldn't actually be active, and therefore not displayed, for the delay time).
Delays are often also used to control flow in a pipeline. For example, in an "escalation" scenario, a notification block might be used to send emails. Since emails are sent instantly, and acknowledgement occurs "asynchronously" (the user must see the email and click the link or log into the system), a delay block could be used to provide time for the user to acknowledge, before moving on to a voice notification block. There is no practical limit to how long a delay can be. The delay is calculated independently for each event entering the block, meaning that each event will be held for the specified time.
Splitter
The Splitter block simply forwards an event to multiple outputs. Any number of outputs can be created. It is very important to remember that this block creates a copy of the alarm event for each output and executes them in parallel. If care is not taking, it is possible to end up with an exponential number of alarm event copies active in the pipelines at one time. Since each notification block operates on a specific call roster, Splitters are useful for delivering events to multiple notification blocks at once.
Switch
The Switch block is very similar to the Expression block, except that the result of the Expression does not need to be a boolean. Instead, it can be a number or string, and it will be looked up against the defined list of expected results. If a match is found, the alarm will follow that path, otherwise the "catch all" output will be used.
For example, imagine that the alarms in the system have associated data for the "Area" that they belong to (the display path could also be used, but would likely contain additional information). If all alarms were categorized according to the area, such as "Area 1", "Area 2", then a Switch block could be defined as such:
Expression: {Area}
Values:
Area 1
Area 2
Area 3
If an alarm did not have an area, or belonged to a different area, the "catch-all" branch would be used.
Expression
The Expression block contains an Expression which is evaluated against each alarm that enters it. The result is expected to be a boolean value, either True or False. The alarm is passed to the corresponding output. The Expression executed by the block is written in the same syntax as other Expressions in Ignition. However, in this context, it is possible to refer directly to properties of the alarm event that is being evaluated by using the standard "{path}" reference syntax. In addition, several functions are available to quickly determine the state of the alarm.
Examples
isActive()
This single function returns whether the current event is active or not. An Expression block like this could be used to then dispatch to an "active" pipeline, and a "clear" pipeline (both the active and clear pipeline settings on the alarm would be set to this dispatch pipeline). This kind of setup allows you to later modify how actives are handled vs. clears in one place, without having to modify many alarms.
toInt({priority})>2 && {displayPath} like "*East Area*"
This block would forward all High and Critical alarms from the "east area" to the true path. The others would go to false, which may not actually be bound to another block, making this Expression block act like a filter.
isPropertyDefined("isEscalated")
This Expression checks if a property exists on the event. The "isEscalated" property is not a system defined property. Instead, in this example, it might be set using a Set Property block before forwarding back to the start of the pipeline. The first time through, this Expression would fail, but the next time, it would pass, and the "escalated" behavior could be executed.
Set Property
The Set Property block allows you to define or redefine a property on the alarm event. The value is created from the given Expression, which can refer to other properties or the same. As described in the pipeline overview, settings modified in this way will only exist while the alarm is in the pipeline, they will not be stored to the journal, or show up in the status table.
Example
If you want to attempt notification up to three times before stopping, you could create a pipeline that looked like [Notification Block] > [Set Property] > [Expression], with the Expression looping back to the notification block (perhaps with a delay in between).
The Set Property block would look like:
Property Name: counter
Expression: coalesce({counter}, 0)+
Note that the first time the block is hit, the counter property will not exist, and therefore the value will be null. The coalesce function returns the first non-null value, allowing us to start with 0. Another way to write this might be:
if(isPropertyDefined("counter"), getProperty("counter"), 0)+1 The getProperty() function is functionally equivalent to simply referencing the property in brackets (that is, {counter}).
The Expression block in this example would simply be: {counter}<3.
Jump
The jump block simply forwards the alarm to a different pipeline.
In this section ...