Getting Started with Ignition
New to Ignition?
Lets get started by getting Ignition running on your computer! Our free trial lets you evaluate the full version of the software without requiring any license.
Download and Install Ignition
The Basics in Ignition
Read these topics and watch the Quick Tour...
A Simple Workflow in Ignition
Follow a step-by-step walk-through...
To get started with Ignition, its helps to have a general idea about the major steps involved in designing your SCADA/HMI projects. Although, there are many creative and innovative ways of using Ignition to do almost anything you want, but the steps provided here are often commonly shared among most projects.
Step 1. Launch the Gateway
Launching the Gateway
The Ignition Gateway is a web server. When it is running, you access it through a web browser. For example, if you are logged into the computer that you installed Ignition on, open up a web browser and go to the address:
http://localhost:8088
and it will launch Gateway and bring up the Gateway Homepage as pictured here.
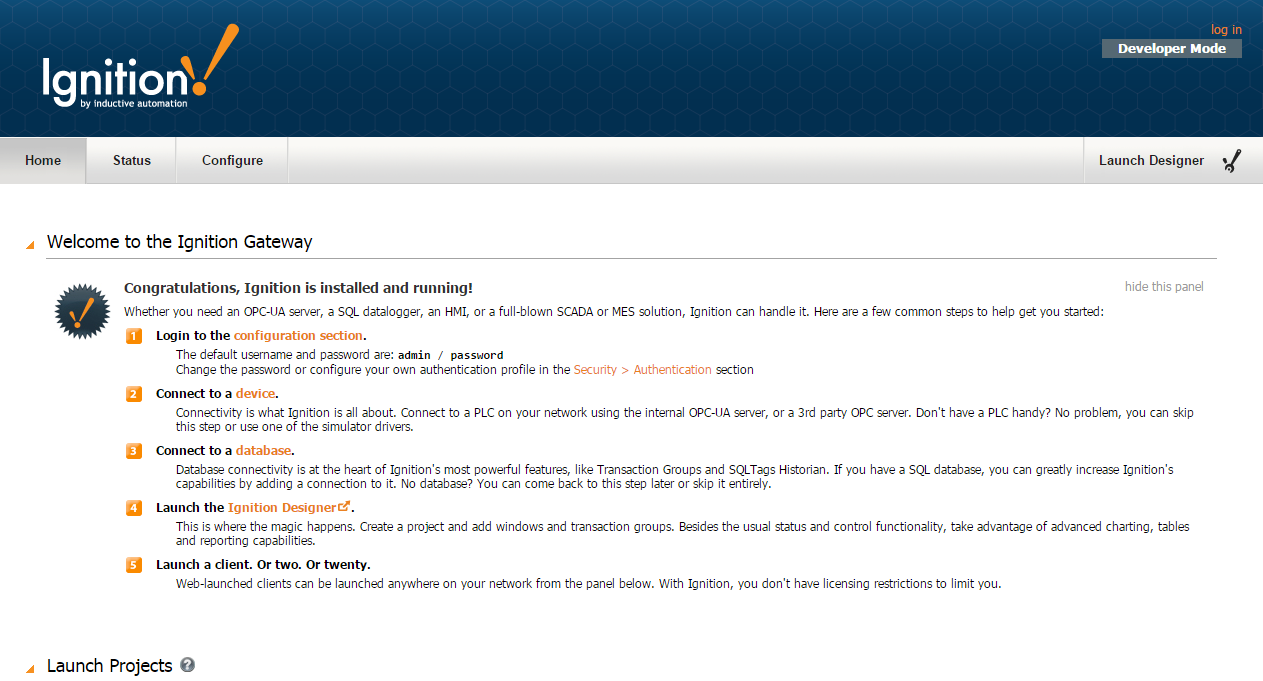
The first time you go to the Gateway Homepage, it shows you 5 common steps to help you get started. You can follow along with these steps and/or with the step-by-step walk through shown on this page, follow the same basic workflow.
Step 2. Connect to a Device
Connecting to a Device
See the following links for the device connection you are interested in:
Step 3. Connect to a Database
Connecting to a Database
After you install your database, you can connect it to Ignition. To get detailed descriptions for a number of different database connections, see Connecting to Database. The common steps in connecting to all databases is as follows:
-
Add a Database Connection
Once you are in the Gateway Configure section of the Gateway's web interface, use the menu on the left to go to the Databases > Connections section. On at the Database Connections page, click on the Create new Database Connection... link at the bottom of the table. -
Pick a JDBC Driver
Ignition connects to databases using JDBC drivers that are unique to each database. Drivers for the most popular databases are included so there is usually no need to install the JDBC driver manually.
Ignition ships with drivers for Microsoft SQL Server, MySQL, Oracle, and PostgreSQL. Pick the JDBC driver for your database, and click on the Next button.
If a suitable driver is not available in the list, you need to add a new JDBC driver for other databases, like IBM DB2, which is not very difficult to do, see Adding a JDBC Driver. -
Configure the Connection
After selecting the driver, you'll configure the settings for the connection. Some settings, such as the Connect URL are specific to the driver that you're using.
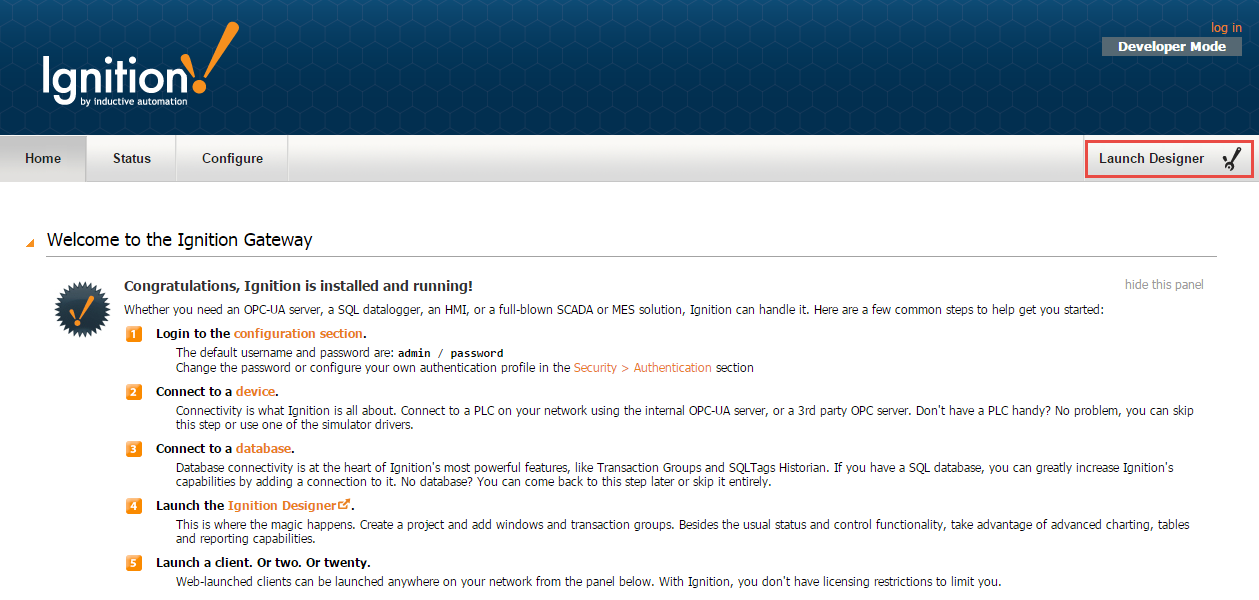
Step 4. Launch the Designer
Launching the Designer
-
Click Launch Designer on the upper-right of any Gateway page.
Your web browser asks you if you want to Keep or Discard a designer.jnlpfile.
-
Click on the designer.jnlp file to start the Designer.
The Designer starts up and the login window is displayed.
-
Enter the default username and password for the Designer. is the same as for the Gateway Configuration section, enter
Username: admin
Password: password
Note:
The default Username is set in the Configure section, under Security > Users, Roles, and going to the manage users link for the User Sourcenamed default. Additionally this Username must be one of the roles defined in the Configure section, under Configuration > Gateway Settings, in Designer Role(s).
The Password (Where do we set the password) must be valid for the System User Source shown in the Configure section of the Gateway under the Configuration > Gateway Settings page.
-
Click on Login.
The Open/Create Project window is displayed giving you two options, to create a new project or open an existing one. As we don't have any existing projects yet, we will create a new project.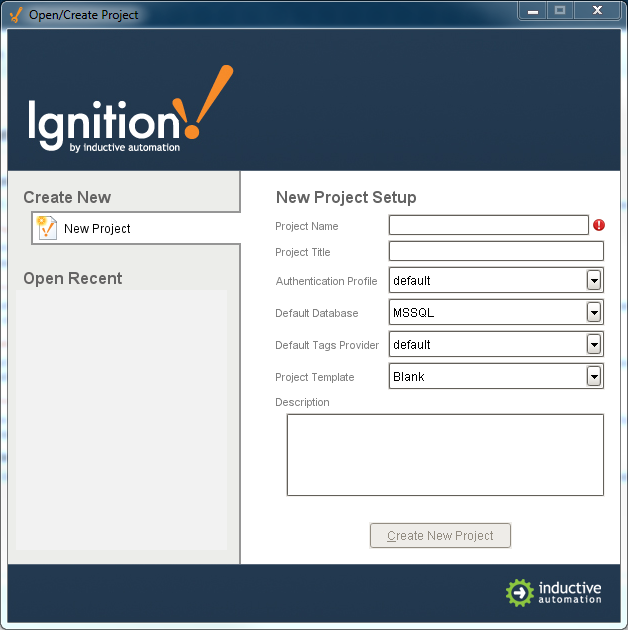
-
In Project Name, enter a name for your new project (no spaces!).
-
For Project Template, select a template from the drop-down list, for example, you can select the Single-Tier Nav, West & North template.
Rather than starting from a blank project, the templates let you start from one of the eight skeleton projects that already have navigation windows setup. These projects are completely customizable and are designed to help you get started faster.

-
Click on Create New Project.
The Designer is now launched and you can work on your project!

Once in the Designer, your can create or open a project using the Designer's File > Open menu. The Open/Create Project window is displayed and you can follow the same steps as above to open existing projects or create a new one.
Step 5. Create Tags
Creating Tags
Now that you are in the Designer, a good first step is to create some Tags. You'll use these tags for realtime status and control and to store history with the Tags Historian. Tags are all configured in the Tag Browser panel.
To create tags by dragging them from OPC
If you have created a device in the earlier step, the easiest way to create some Tags is by dragging the tags from the OPC Browser.
-
In the Tag Browser, select the Tags folder and click the Browse OPC Servers icon.
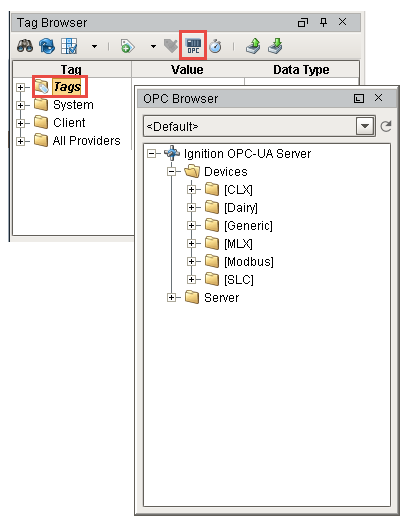
The OPC Browser is displayed and you can browse all of your OPC connections.
By default, you've got a connection to the internal Ignition OPC-UA Server, which has the devices in it you created earlier. Browse the devices and find some tags that you're interested in. -
From the OPC Browser, highlight the tags (for example, as in the picture below, folders inside the Sine folder) and drag them to the Tags folder in the Tag Browser.
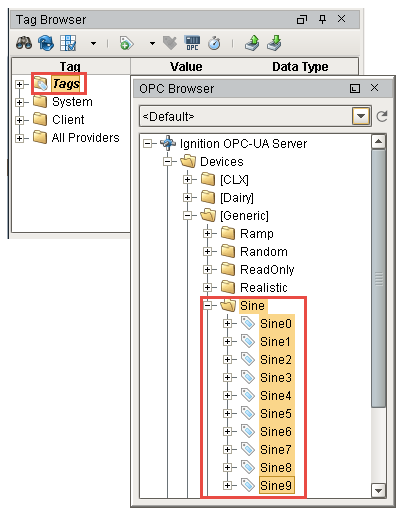
You can drag individual tags or folders. When you drag folders, Ignition keeps the same hierarchy as the PLC. As soon as you drag the tags into Tag Browser, you can see their values being updated in the Tag Browser,
That's it! You now have some Tags. You can see their values come in and start updating automatically. By default, they update at a rate of 1 per second.
Step 6. Launch Clients
Launching a Client
Now that we've created a project, lets launch a Client to see it in action.
-
From the Designer toolbar, select File > Save and Publish to save your project.
-
Go back to the Gateway Home page.
Your project will appear in the Launch Projects panel with a big Launch button to its right. -
Click on the Launch button to start up a Client.
-
Login to the Client using
Username: admin
Password: password
By default, a new project uses the same user source as the Gateway, so the admin/password credentials will work. -
After you logged in, you can see your Client window displaying your project.
-
Go back into the Designer, make a change to the window, and click File > Save and Publish.
Your Client will show a notification saying that there are updates to the project. -
Click on the notification and the Client will update itself.
You can launch as many Clients as you want! If you've got other computers on the same network as the Gateway computer try launching on them too. Make sure that your Gateway computer doesn't have a Firewall enabled, otherwise, it is allowing traffic on port 8088 - the default port for the Ignition web server.
Step 7. Add History to Tags
Adding History to Tags
Do the following steps to log history data for your tags:
-
Go to the Designer, from Tag Browser, select one or more tags.
For example, select all the Sine tags in the Sine folder. -
Right-click on the selected tags, and then select Edit tag(s).
The Tag Editor window is displayed. Here, you can edit the tag and change the name, data type, scaling options, metadata, permissions, history, and alarming.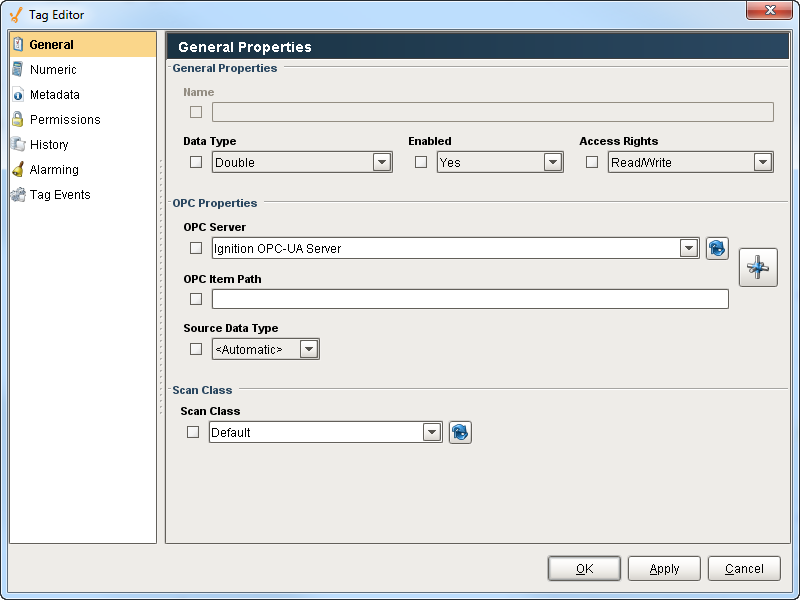
-
Click on History on the left side of Tag Editor.
-
Click Yes for Store history for this tag.
-
Choose a database from the History Provider dropdown.
For example, choose mysql as the database you want to log to. -
Choose Default for Historical Scanclass.
This sets the rate at which data is logged. The default is set to 1 second which means data is logged every second.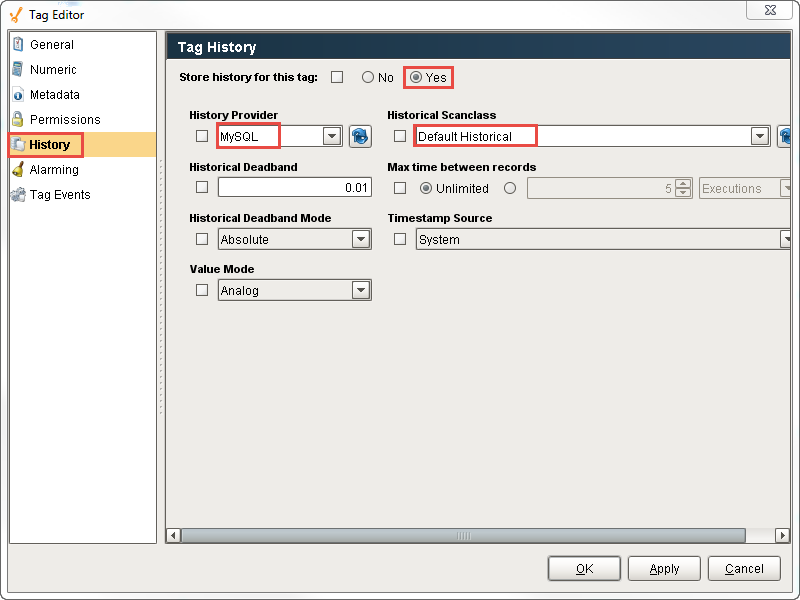
-
Click OK.
Now look in the Tag Browser, to the right of each Sine tag that is storing history, an icon appears letting you know it is setup.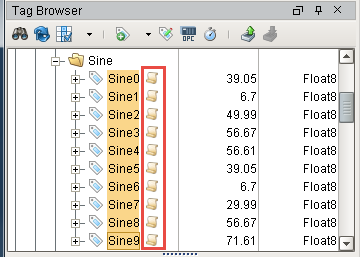
If you were to look in your database, you can see all the tables and data Ignition has created for you.
Step 8. Create a Graph
Creating a Tag History Graph
You can see the tag history data, by creating a graph. Your graph can include subplots, axes, and a moving average pen. You can view the runtime data in realtime or historical mode.
To create a tag history graph
-
Open your Main Window, from the Charts tab of the Component Palette, drag in the Easy Chart component.
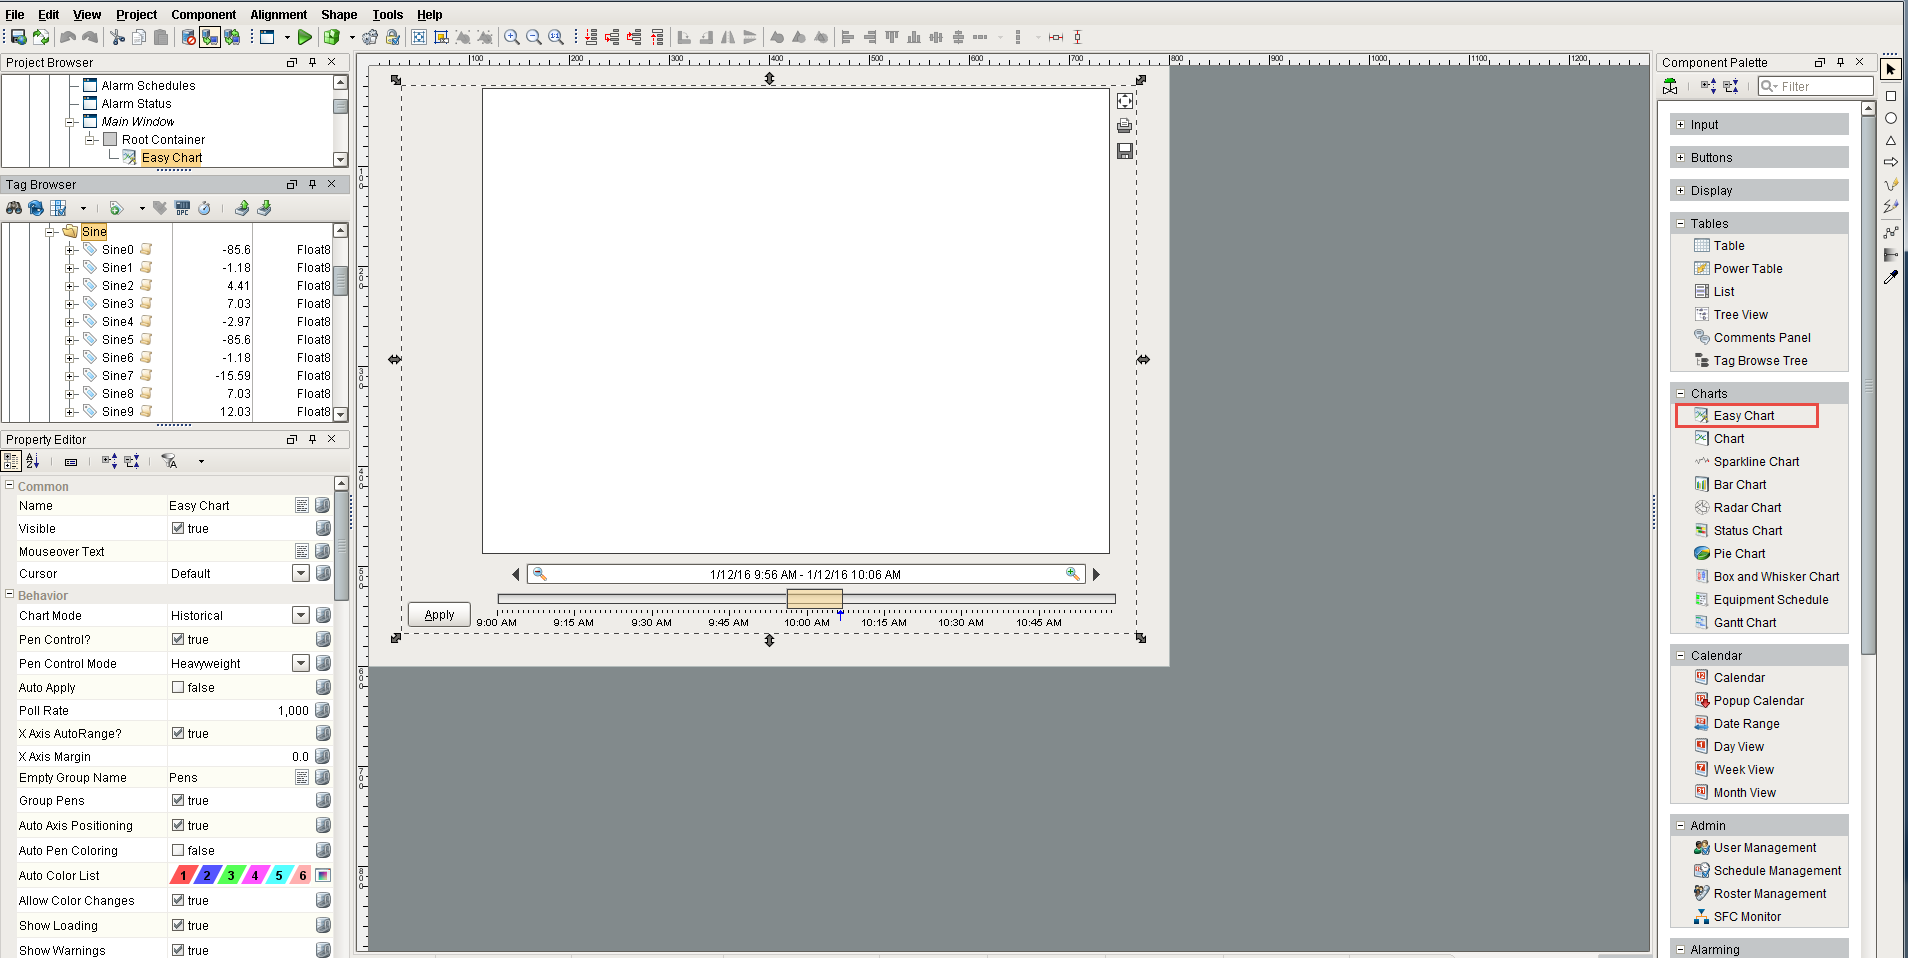
We can add the tags to the graph the same way we created the status and control windows, that is, through drag and drop.
-
Drag all the Sine tags from Tags Browser to the graph.
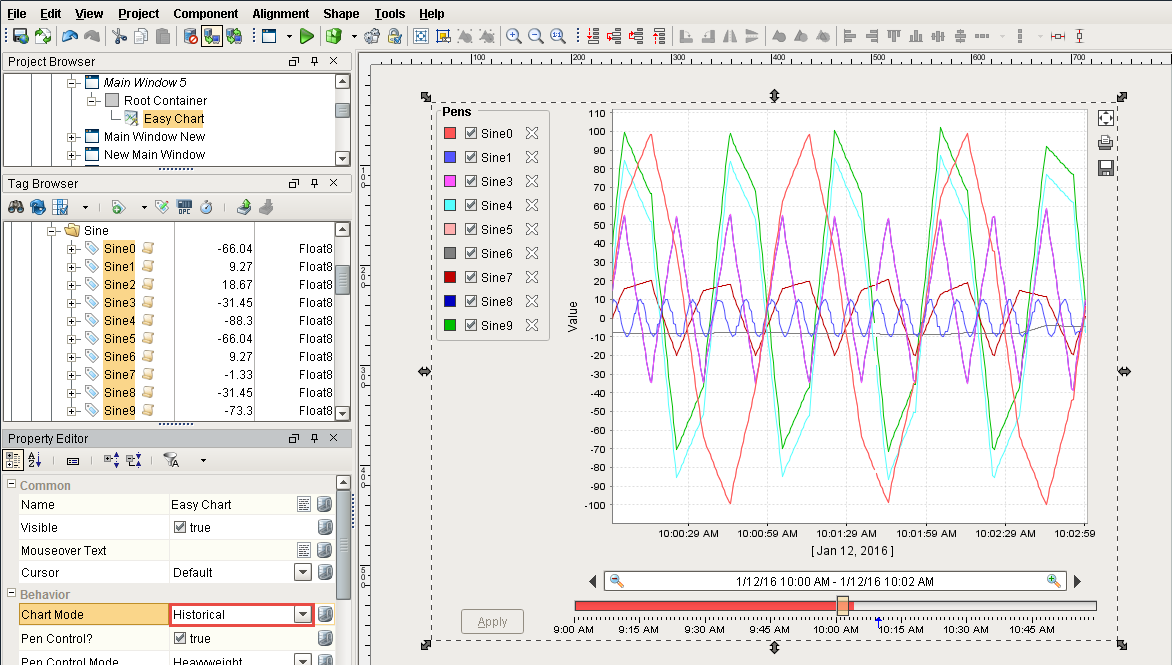
The tags are displayed on your Main Window but because you have just started logging data, not much data will show up.
-
To show more data, set the Chart Mode property of Easy Chart to Realtime.

Next...
Ignition has a web of features and there is no way to go through them all in the "correct" order. This section of each page shows you a list of items that are related to what you are currently looking at. Think of it as a "Further Reading" section; just about every topic has few pages that you can use to expand on. For example: on the Alarm setup page you might want to learn more about displaying the alarms on a window, or maybe how to send email alarm notifications. To learn more about one of these related subjects, just click the link and you will be taken to the page for that feature/topic.
-
Check out common automation terms in the Glossary (this is also available on each page that a glossary term is found!)