Launching Clients
Clients are launched from the Gateway Home page, for a specific project. They run as full applications and feel like a traditional installed Client, without the need to install and manually synchronize projects.
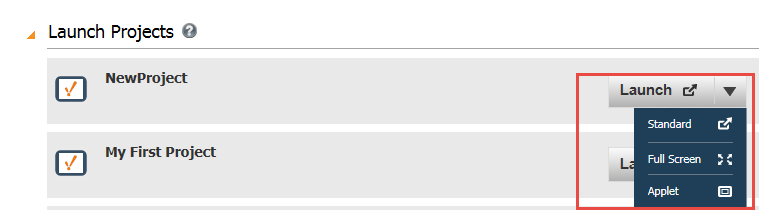
There are three ways to run Clients: Windowed, Full Screen, and Applet. You can choose the mode from the dropdown next to the project name. By just clicking on the project name, the project is launched in the default mode. Certain modes may not be available, depending on project settings.
-
Using the Windowed Option
The Windowed launch mode is the Standard launch method. The Client will be web-launched using Java Web-Start and will have its own window. In this mode, the Client runs as a full, independent application. After being launched, the browser can be closed and the project can be launched from a shortcut on the desktop.
-
Using the Full Screen Option
The Full Screen launch mode is similar to the Windowed mode, and will also use web-launching to run the Client as a full, independent application. In this mode, however, the Client will occupy the full screen, and will not have a title bar. This mode is ideal for touch-screen display panels, and other
displays where the Ignition project is the sole focus on the screen. -
Using the Applet Option
Selecting Applet launch mode will run the Client application as an applet embedded in your web browser. Applet mode is most commonly used to integrate Vision projects into existing web sites, such as in a corporate intranet setting. See for detailed information. -
Using the Mobile Option
If you have the Mobile module installed, you can launch projects on your smartphone or tablet as well. All the user has to do to launch a mobile Client is to connect their mobile device to the wireless network and point the web-browser to the Gateway's LAN address. At this point, they'll be presented with a mobile-optimized version of the Ignition Gateway homepage, where they can select a project to launch. Note that projects must have at least one window defined and be enabled for mobile launching in order to show up in this list. After selecting a project and logging in, they can use the project like a normal project. To access the mobile project context menu, press and hold on your touch-sensitive device. A circular menu will appear allowing you to switch between pointer and pan/zoom mode, as well as options for logging out and entering text input.
Launching a Client
Now that we've created a project, lets launch a Client to see it in action.
-
From the Designer toolbar, select File > Save and Publish to save your project.
-
Go back to the Gateway Home page.
Your project will appear in the Launch Projects panel with a big Launch button to its right. -
Click on the Launch button to start up a Client.
-
Login to the Client using
Username: admin
Password: password
By default, a new project uses the same user source as the Gateway, so the admin/password credentials will work. -
After you logged in, you can see your Client window displaying your project.
-
Go back into the Designer, make a change to the window, and click File > Save and Publish.
Your Client will show a notification saying that there are updates to the project. -
Click on the notification and the Client will update itself.
You can launch as many Clients as you want! If you've got other computers on the same network as the Gateway computer try launching on them too. Make sure that your Gateway computer doesn't have a Firewall enabled, otherwise, it is allowing traffic on port 8088 - the default port for the Ignition web server.
See also: Launching Clients and Using the Native Client Launchers .
Local Client Fallback
Ignition Clients are fully dependent on being able to communicate with a Gateway. If Gateway communication is lost, the Client suspends operation while it attempts to reconnect with the Gateway. This can be a problem when you need the Client to monitor critical operations on a plant floor.
Ignition provides a local Client fallback mechanism that lets you to use a Gateway running on the local machine. In normal operation, your Client can connect to a central Gateway located somewhere on the network. The central Gateway would be responsible for all data aggregation, such as storing historical data in a database. But if communication to the central Gateway is lost, the Client can automatically retarget to a project that you specify in the local Gateway. This project should contain the minimal realtime information that you need to keep your operation running. Note that in order to use local fallback, port 6501 must be open on the local machine.
To enable local fallback, do the following steps:
-
Go to Configuration > Gateway Settings in the local Gateway.
-
Scroll down to the Local Client Fallback section and select the Enable Local Fallback.
-
Select a Fallback Project from the dropdown list.
Note that the project that you select must be published in the local Gateway and it must have at least one main window. -
Optionally, you can change the Seconds to Failover setting to a value other than 60 seconds.
This setting controls the number of seconds to wait before fallback automatically starts. During comm failure, you can also click a button to load the local fallback project immediately.
When local fallback is enabled, the Client attempts to open port 6501 on the local machine. If the port can be opened successfully, the Client reads fallback settings from the local Gateway and shows a Fallback Project button on the bottom of the Gateway Connection Lost window. You can click this button at any time to load the fallback project, or simply wait for the fallback project to automatically load. You may want to set the local Client to automatically log in to avoid typing in a username and password when the Client loads. This can be set in the Login section of the project's properties.
Testing Local Fallback
Testing local fallback is highly recommended before you start to depend on it in a production setting. The easiest way to test fallback is to simply unplug the network cable to the Client machine, or disable the network card on the machine. If the Fallback Project button is not visible on the Gateway Connection Lost window, check your local Gateway console and verify that the message Started Fallback Socket on port 6501 is present in the console. Any other error message related to the Fallback Socket Controller indicates that some other problem has occurred (most likely the port cannot be reserved) and local fallback is not available to Clients.
Client Retargeting
Client Retargeting is the method by which Clients running a particular project switch to a different project on the fly, even if the other project is hosted on a different Ignition Gateway. Retargeting is a key feature used to build distributed systems. It allows you switch between projects and servers as easily as switching between windows. Using Retargeting, even geographically dispersed projects can be presented as a single cohesive unit.
Reconnect to Central
In many circumstances, the communication loss to the central Gateway is only a temporary event. To minimize the amount of time that you need to run the local Client, you can add some functionality to the Client that allows you to check on the status of the central Gateway. One way to do this is to add a timer script to your local Client. The script calls the system.util.getGatewayStatus() function at regular intervals and updates an item such as a Client tag with the Gateway status. Then, you can bind an indicator component to the Client tag and get ongoing visual feedback on the central Gateway status. As soon as you can confirm that the central Gateway is running again, you can call the system.util.retarget() function in a button to seamlessly direct the Client back to the central Gateway.
In this section ...