Pipeline Blocks
Pipeline Blocks are the building blocks for the Alarm Pipeline Notification system. Each block has an input and zero or more outputs. Each block has its own unique functionality and performs a specific action for the pipeline, such as sending a notification, setting a property, or evaluating an expression.
Let's look at the different pipeline blocks that come with the Alarm Notification system. There are 8 blocks above your Pipeline Workspace that you can choose from to build your alarm notificaion pipeline.
When you create a new pipeline, you always get a Start Block placed in your Pipeline Workspace. You cannot delete the Start Block because it represents the entry point for alarm events into the pipeline.

The most basic block is the first one called the Notification Block. It allows you to notify an individual or a group of people via Email, SMS or Voice.
Drag the Notification Block to your Pipeline Workspace. Click the Notification tab in the Pipeline Block Editor. Choose one of the Notification profiles that you configured. For this example, choose 'Email.'

From the Contacts tab, you can specify the On-Call Roster who you want to send the alarm notification too. In this example, several rosters were already configured. Select 'Operators' as your on-call Roster.
You will notice that the Notification Block is now updated with your 'Email' profile and 'Operators' on-call roster.

The Delay Block delays an alarm event for a specified period of time before moving to the next block.
Click the Delay Block and a spinner will appear in the Pipeline Block Editor. You can specify the number of seconds to delay. In this example, if you enter 300 seconds, the alarm will wait 5 minutes before sending it to the Operators.

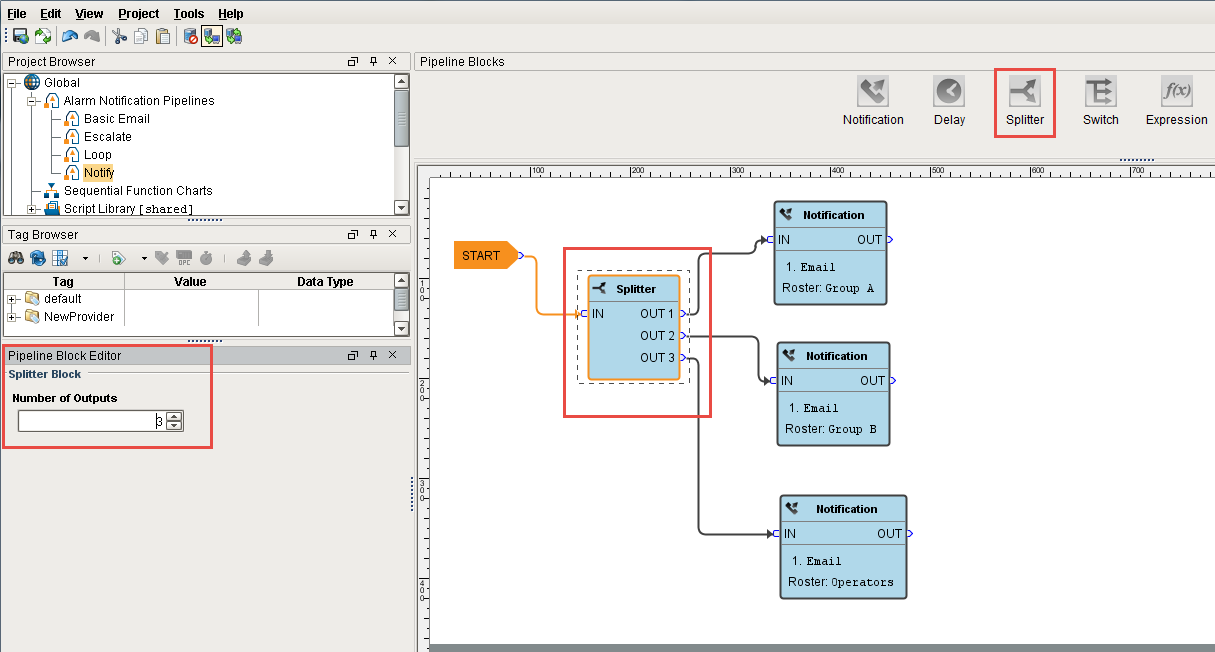
The Splitter Block simply forwards a single alarm event to multiple outputs at the same time. It creates a copy of the alarm event for each output and executes the alarm notifications along multiple paths at the same time. You can specify as many outputs as you want.
Splitter Blocks are useful for delivering alarm events to multiple notification blocks at once as shown in this example.
The Switch Block evaluates an expression and forwards it to an output based on a given result.
In the Pipeline Block Editor, you can create any expression and even use the alarm event's priority, associated data, value and more. This example uses the 'Group' associated data with 'Group A' and 'Group B' values. The Switch Block will evaluate the expression results against these defined values, and if a match is found, the alarm will follow that path. If neither of the values are met, the Catch-all output will be used.
This example demonstrates that a pipeline can send out an alarm to 2 different lists of people based on the Group. The pipeline will not do anything if the alarm does not have a group.

The Expression Block evaluates an expression that results in either a 'True' or 'False' value and forwards the alarm event to that specific output.
In the Pipeline Block Editor, you can select the Alarm Properties from the icons on the right.
This example uses an expression to check to see if the priority is 'Critical', and if so, the alarm notification will follow the 'True' path. If it is not 'Critical', it will follow the 'False' path. As you can see, the 'False' output is not configured. You don't have to configure every output if you don't want too.
{priority}="Critical" 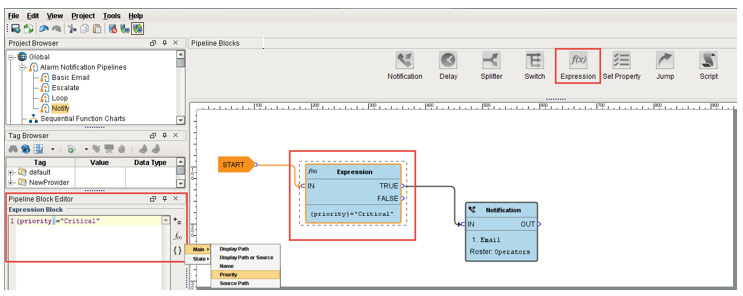
The Set Property Block allows you to set a value in the pipeline that you can use in the alarm event. This value is created from the Expression Block. Typically, the Set Property Block is used as a counter for the number of times you have been looping or, in this example, notifying people in your on-call roster.
Drag 2 Set Property Blocks to your Pipeline Workspace. Assign the first Set Property block to a Property Name 'numCalls' and a Property Value of 0. The second Property Block you need to increment the counter. Enter '{numCalls} + 1' as shown in the Pipeline Property Editor. Each time the alarm goes through this block, the 'numCalls' variable increments by 1. If no one acknowledges the alarm, it is sent to the Production Supervisors on-call roster.
To see an example that loops to notify the Operators 3 times, go to the Pipeline - Escalation page.

The Jump Block forwards an alarm event to a different pipeline. You can breakup a pipeline into several different pipelines and use the Jump Block to go back and forth between pipelines. This is perfect for an escalation pipeline because often times they can become one massive pipeline, and the Jump Block can make the escalation pipeline less complicated and more compact.
In the Pipeline Block Editor, enter the Destination pipeline called 'Escalate.'
In this simple example, the Jump Block forwards the alarm to the Escalate pipeline and ends there.

The Script Block allows you to execute a task outside the pipeline like writing to another alarm tag or database. In this example, the Script Block was used to notify the production supervisors of an alarm using another alarm tag as shown in the Pipeline Block Editor.

In the next sections, you will see how to use a combination of the different pipeline blocks to create your own unique pipelines.